Craving Indulgence Without the Guilt?
You want a dessert that’s chocolatey, creamy, nutty—and still fits your keto lifestyle? It feels impossible, right?
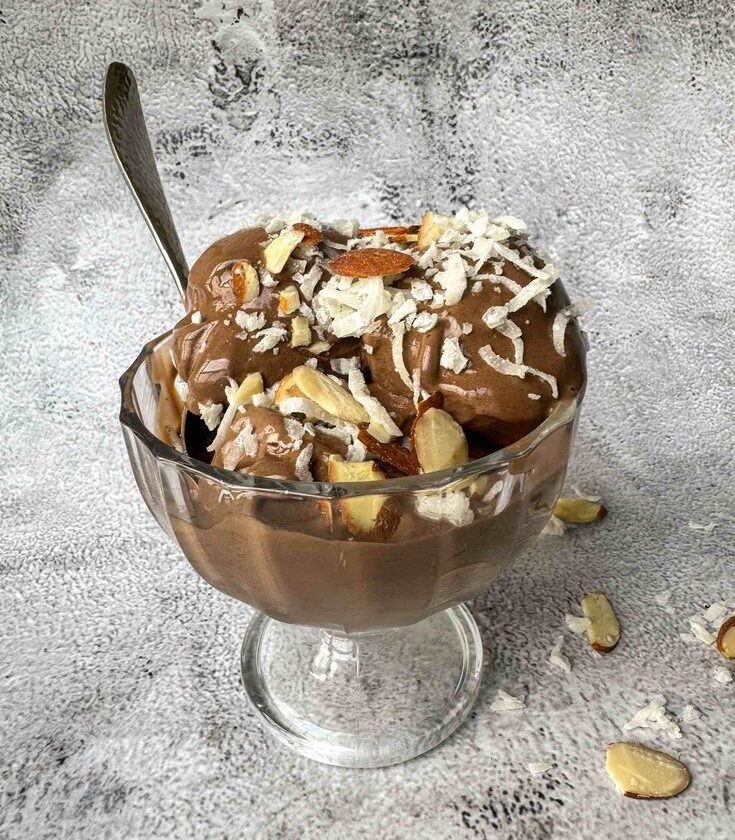
Not anymore. This Ninja Creami Keto Chocolate Almond Ice Cream delivers luscious chocolate flavor, crunchy almond texture, and perfectly smooth creaminess—all while staying under 6g net carbs per serving. It satisfies cravings, fits macros, and tastes like a treat you’d happily indulge in.
1. Why This Chocolate Almond Flavor Pairs Perfectly with Keto
What makes this recipe so irresistible?
- Deep chocolate richness without any sugar
- Almonds add healthy fat and crunch, without loading carbs
- Ninja Creami ensures creamy texture without sugar or stabilizers
- Simple ingredients you can trust and pronounce
This dessert hits flavor and nutrition without compromise.
2. Ingredients You’ll Need for Your Homemade Pint
Here’s your shopping list for this keto-friendly indulgence:
Creamy Chocolate Base:
- 1 cup unsweetened almond milk
- ½ cup heavy cream
- 3 tbsp allulose or monk fruit sweetener
- 2 tbsp unsweetened cocoa powder
- 1 tsp vanilla extract
- Pinch of sea salt
Crunchy Almond Delight:
- ¼ cup whole almonds
- 1 tbsp sliced almonds, toasted (optional topping)
- 1 tsp almond extract (optional, for extra flavor)
Optional Texture Upgrade:
- 1 tbsp collagen peptides or unflavored protein powder
3. Essential Tools and Prep Tips
No need for fancy gadgets—just your Ninja Creami and these basics:
- Ninja Creami with pint container and blade
- Mixing bowl and whisk
- Baking sheet (for toasting almonds)
- Measuring spoons and cups
- Freezer space (24-hour freeze required)
That’s it—no churning required.
4. Step 1 – Toast Your Almonds
To intensify the nutty flavor:
- Preheat your oven to 350°F (175°C).
- Spread whole almonds on a baking sheet.
- Toast for 8–10 minutes until fragrant.
- Let them cool, then chop coarsely. Reserve some sliced almonds for topping.
The warm aroma sets the tone for this deluxe dessert.
5. Step 2 – Mix the Chocolate Almond Base
Here’s how to build flavor step by step:
- In a bowl, whisk together almond milk, heavy cream, sweetener, cocoa, vanilla, and salt until smooth.
- Stir in chopped toasted almonds and optional almond extract.
- Taste the mixture. Want richer flavor? Add more cocoa; want sweeter? Add a pinch more allulose.
6. Step 3 – Assemble and Freeze
Let’s get it ready:
- Pour the base into the Ninja Creami pint—stay under the Max Fill line.
- Sprinkle sliced almonds on top.
- Seal the lid and freeze upright for at least 24 hours. Don’t skip this—texture depends on it.
7. Step 4 – First Spin with the Ninja Creami
Time to work magic:
- Attach the frozen pint to the Creami outer bowl and thread the blade lid.
- Select the “Ice Cream” function and spin.
- Once done, check texture. If crumbly or dry, add 1 tbsp heavy cream or almond milk and re-spin.
You’ll now have creamy, scoopable chocolate almond ice cream.
8. Step 5 – Swirl in Crunch and Flavor
Make it even better:
- Create a well in the center.
- Spoon in chopped almonds and any leftover sliced almonds.
- Use the “Mix-In” function to evenly distribute the crunch.
Now every spoon delivers chocolate creaminess and nutty texture.
9. Nutrition Snapshot—Keto-Friendly Macros
Here’s what you get per 16-oz pint (~2 servings):
| Nutrient | Amount |
|---|---|
| Calories | 380–420 |
| Net Carbs | 5–6g |
| Fat | 35–38g |
| Protein | 6g |
| Sugar | 0g added |
Deliciously low-carb and nutrient-rich.
Video:
10. Variations to Keep the Fun Going
Here are some flavor ideas:
- Mint Chocolate Almond: Add ½ tsp peppermint extract; fold in sugar-free chocolate chips.
- Mocha Almond: Dissolve 1 tsp instant espresso in the base before freezing.
- Coconut-Chocolate Crunch: Add 2 tbsp unsweetened shredded coconut with almonds.
- Salted Caramel Almond: Drizzle sugar-free caramel sauce and sprinkle sea salt before serving.
Plenty of ways to tailor the recipe to your taste.
11. Troubleshooting Guide—Solutions for Common Issues
Even great recipes benefit from tips:
- Crumbly texture? Re-spin with a splash of liquid.
- Weak flavor? Increase cocoa or almond extract before freezing.
- Icy chunks? Make sure your sweetener stays fully dissolved before freezing.
- Not creamy enough? Boost fat content with more heavy cream or collagen.
Keep adjusting until you nail the perfect texture and taste.
12. Storage Tips & Re‑Serving Advice
Planning ahead? Follow these steps:
- Smooth the surface, seal tightly, and refreeze flat.
- When ready to serve again, let sit 10 minutes, add 1 tbsp cream, and re-spin.
- Ice cream stays good up to 2–3 weeks. Texture refreshes beautifully.
13. Why Homemade Covers Beats Store-Bought
Sure, you could buy keto ice cream—but here’s why you should DIY:
- Ingredient control: No mystery sweeteners or stabilizers.
- Flavor customization: You decide chocolate intensity, nut ratio, textures.
- Cost-effective: You save money compared to prepackaged keto pints.
- Freshness: Just-made flavors taste so much better.
No compromises. Just full control.
14. Final Thoughts—Should You Make This?
Absolutely. If you’re craving:
- Decadent chocolate
- Crunchy almond texture
- Keto-friendly macros
- Simple, approachable prep
…the Ninja Creami Keto Chocolate Almond Ice Cream is a must-try. It brings the scoop-shop experience home, without breaking your meal plan.
Time to Get Scooping
Toast your almonds tonight, prep the base, freeze the pint, spin it tomorrow—and treat yourself to a decadent, low-carb, chocolate-almond dessert experience. You deserve every creamy, nutty bite!